Why is My Kitchen Faucet Water Pressure Low: Quick Fixes Revealed
Is your kitchen faucet struggling to deliver a strong stream of water? Low water pressure can make simple tasks like washing dishes or filling a pot frustrating and time-consuming.
You might wonder, “Why is my kitchen faucet water pressure low? ” The good news is, this common problem usually has straightforward causes and even easier fixes. You’ll discover the main reasons behind weak water flow at your kitchen sink and learn simple steps you can take to restore full pressure—so you can get back to enjoying a smooth, efficient kitchen experience.
Keep reading to find out how to tackle this issue quickly and effectively.
Common Causes
Low water pressure in kitchen faucets frustrates many homeowners. The causes vary from simple blockages to mechanical issues. Identifying the root cause helps fix the problem fast and prevents future issues.
Several common reasons reduce water flow in your kitchen faucet. Some are easy to check and fix yourself without calling a plumber.
Clogged Aerator
The aerator is a small screen at the faucet’s tip. It mixes air with water for a steady flow. Over time, mineral deposits and debris clog the screen. This buildup lowers water pressure and causes uneven flow. Cleaning or replacing the aerator restores normal pressure quickly.
Sediment In Cartridge
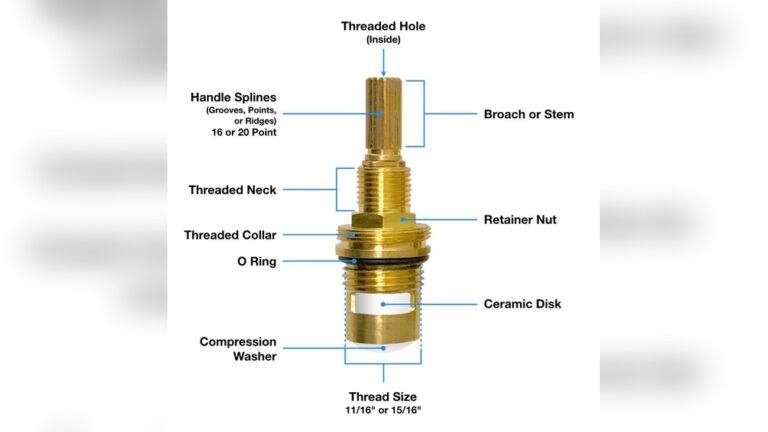
The cartridge controls water flow inside the faucet. Sediment from hard water collects inside the cartridge. This buildup restricts water movement and lowers pressure. Removing the cartridge and cleaning it can improve flow. Sometimes, the cartridge needs replacement if damaged.
Partially Closed Valves
Valves under the sink control water supply to the faucet. If these valves are not fully open, water pressure drops. Check the valves by turning them counterclockwise to open fully. Partially closed valves are a common cause of low pressure and easy to fix.
Kinked Supply Lines
Flexible supply lines connect the water pipes to the faucet. If these lines bend or kink, water flow reduces. Inspect the supply lines for twists or sharp bends. Straighten or replace damaged lines to restore proper pressure.
Pull-out Sprayer Issues
Pull-out sprayers often have small hoses inside the faucet. These hoses can get twisted or clogged. Twisting reduces water flow to the sprayer and faucet. Check the hose for kinks or blockages and straighten it carefully. Cleaning the sprayer head may also help.
Water Heater Problems
Low hot water pressure often links to water heater issues. Sediment buildup inside the heater reduces flow. A faulty heating element or valve can also limit water pressure. Flush the water heater and inspect its parts to fix hot water pressure problems.
Credit: www.youtube.com
Checking Aerator Blockages
Checking the aerator for blockages is an important step in fixing low water pressure. The aerator is a small screen at the faucet’s tip. It mixes air with water to reduce splashing. Over time, minerals and debris can clog this screen. This blockage lowers water flow. Cleaning the aerator often restores normal pressure quickly. Follow these simple steps to check and clean your faucet aerator.
Removing The Aerator
Start by turning off the faucet. Use your hand or a wrench to unscrew the aerator carefully. Protect the aerator with a cloth if using a wrench. Place the aerator on a clean surface. Check it for visible dirt or mineral buildup. This step allows you to see if the aerator is the cause of low pressure.
Cleaning With Vinegar
Fill a small bowl with white vinegar. Soak the aerator parts in the vinegar for 30 minutes. Vinegar dissolves mineral deposits naturally. After soaking, scrub the aerator gently with a soft brush. Make sure to remove all debris from the screen and parts. Rinse the aerator thoroughly with water to remove vinegar and loosened dirt.
Reinstalling The Aerator
Place the cleaned aerator back onto the faucet tip. Screw it on by hand first to avoid cross-threading. Tighten with a wrench only if needed. Turn the faucet on and check the water flow. The pressure should improve if the blockage was in the aerator. Repeat cleaning if necessary for best results.
Cleaning Or Replacing Cartridge
Low water pressure in your kitchen faucet often relates to problems inside the faucet itself. The cartridge is a key component controlling water flow and temperature. Over time, mineral deposits can clog it, or the cartridge may wear out. Cleaning or replacing the cartridge often restores proper pressure and smooth faucet operation.
Locating The Cartridge
Begin by turning off the water supply under the sink. Remove the faucet handle using a screwdriver or an Allen wrench. Look inside the faucet body to find the cartridge. It is usually a cylindrical part held in place with a retaining nut or clip. Knowing the exact model of your faucet helps find the right cartridge.
Removing Mineral Buildup
Mineral deposits block water flow and reduce pressure. Soak the cartridge in white vinegar for about 30 minutes. Use a soft brush to scrub away loosened deposits. Rinse the cartridge with clean water. Dry it completely before reinstalling. This cleaning often improves water flow without needing a new cartridge.
Replacing The Cartridge
If cleaning does not improve pressure, replace the cartridge. Remove the retaining nut or clip holding it in place. Pull the old cartridge straight out. Insert the new cartridge, aligning it properly. Secure it with the nut or clip. Reattach the faucet handle and turn the water back on. Test the faucet to ensure strong water pressure.

Credit: www.youtube.com
Adjusting Shut-off Valves
Adjusting shut-off valves is a simple step to fix low water pressure in your kitchen faucet. These valves control water flow to your faucet. Sometimes, they are not fully open, which reduces pressure. Checking and adjusting them can restore proper flow quickly.
Locating Valves Under Sink
Find the shut-off valves beneath your kitchen sink. Usually, two valves exist—one for hot water and one for cold. They connect the water supply lines to the faucet. Valves are small knobs or levers on pipes coming out of the wall or floor. Clear any items blocking access to them.
Ensuring Full Valve Opening
Turn each valve counterclockwise to open fully. Valves partially closed limit water flow and pressure. Open them slowly but completely. Avoid forcing the valve if it feels stuck. Use a wrench carefully if needed. After adjusting, test your faucet for improved pressure. Repeat if necessary until water flows well.
Fixing Supply Line Issues
Low water pressure in your kitchen faucet often traces back to supply line issues. These lines carry water from your home’s plumbing to the faucet. If they get twisted or damaged, water flow slows down. Fixing these problems can restore strong, steady pressure quickly.
Identifying Kinks Or Twists
Check under the sink for supply lines that look bent or twisted. Kinks block water flow and reduce pressure. Sometimes lines are pinched by tight cabinet space or objects stored nearby. Carefully move anything pressing on the lines. Look for sharp bends or loops in the hoses.
Gently feel the lines for soft spots or cracks. These can also cause leaks and pressure loss. A flashlight helps spot hidden damage or sharp bends in dark cabinets. Finding kinks early prevents bigger plumbing issues later.
Straightening Or Replacing Lines
Straighten supply lines by gently bending them back into shape. Avoid forcing them, which can cause cracks. Smooth curves allow water to flow freely. If a line stays kinked or damaged, replace it. New lines cost little and improve water pressure.
Turn off the water supply before replacing any lines. Use flexible braided stainless steel lines for durability. Connect the new line securely to avoid leaks. Test the faucet water pressure after installation. Properly installed supply lines keep water flowing strong.
Addressing Pull-out Sprayer Blockages
Low water pressure in your kitchen faucet often stems from blockages in the pull-out sprayer. This part can collect debris over time, reducing water flow. Clearing these blockages restores proper pressure and improves faucet performance.
Addressing sprayer blockages involves careful inspection and cleaning. The process starts by disconnecting the hose and then cleaning the connector. These steps remove buildup and allow water to flow freely again.
Disconnecting The Hose
First, pull out the sprayer hose gently from the faucet. Locate the connection point under the sink. Turn off the water supply valves to prevent leaks. Use pliers if the connector is tight but avoid damaging the hose. Carefully unscrew the hose from the faucet body. Keep a bucket or towel nearby to catch water spills. Once detached, check the hose for visible clogs or mineral buildup inside.
Cleaning The Connector
Inspect the connector for debris and sediment. Soak it in a mixture of white vinegar and water for 30 minutes. This solution helps dissolve mineral deposits. Use a small brush or toothpick to clear any stubborn particles. Rinse the connector with clean water thoroughly. Reattach the hose securely to the faucet and turn on the water supply. Test the sprayer to ensure water pressure is restored.
When Hot Water Pressure Is Low
Low hot water pressure in your kitchen faucet can be frustrating. It often points to issues beyond just the faucet itself. Problems inside your water heater might reduce the flow of hot water. Checking these problems helps restore good pressure and hot water flow.
Checking Water Heater Function
Start by testing your water heater’s performance. Low hot water pressure might mean the heater is not working well. Look for signs like inconsistent water temperature or strange noises. Check if the heater is heating water properly. If the heater is old or damaged, it might need repair or replacement.
Also, examine the heater’s pressure relief valve. A faulty valve can reduce water pressure. Make sure the heater’s thermostat is set correctly. Sometimes, low settings cause weak hot water pressure. Confirm the heater’s power or gas supply is steady and uninterrupted.
Flushing Sediment From Heater
Mineral buildup inside the water heater can block water flow. Sediment collects over time and lowers hot water pressure. Flushing the heater removes this buildup. Turn off the heater and let the water cool. Attach a hose to the drain valve and drain some water into a bucket.
Flush the heater until clear water flows out. This process clears out sediment and improves water pressure. Regular flushing keeps the heater efficient. It also extends the life of your water heater. Schedule flushing at least once a year to avoid pressure problems.
Main Water Supply Problems
Preventive maintenance helps keep your kitchen faucet working well. Regular care stops low water pressure problems early. Simple checks and cleaning can save time and money. Follow these easy steps to maintain good water flow.
Regular Aerator Cleaning
The aerator is at the faucet’s tip. It mixes air with water to control flow. Dirt and minerals can block it over time. Remove the aerator every few months. Soak it in vinegar to dissolve deposits. Use a small brush to clear debris. Rinse well and screw it back on.
Inspecting Supply Lines
Supply lines connect your faucet to water pipes. They can become kinked or clogged. Check these lines under the sink regularly. Look for bends, cracks, or leaks. Straighten any kinks gently. Replace damaged lines to restore proper flow.
Routine Valve Checks
Shut-off valves control water flow to the faucet. Sometimes valves are partially closed or stuck. Test the valves by turning them fully off and on. Ensure they move smoothly and are not corroded. Fix or replace faulty valves to keep water pressure strong.
Credit: www.estesair.com
Frequently Asked Questions
How Do I Fix Low Water Pressure In My Kitchen Faucet?
Check and clean the aerator to remove mineral deposits. Fully open shut-off valves under the sink. Inspect and straighten kinked supply lines. Clean or replace the faucet cartridge if clogged. For hot water issues, inspect the water heater.
What’s The Average Lifespan Of A Kitchen Faucet?
The average lifespan of a kitchen faucet ranges from 15 to 20 years with proper care and maintenance. Regular cleaning prevents buildup and prolongs functionality.
Why Spray Wd-40 Up Faucets?
Spraying WD-40 on faucets loosens stuck parts, prevents rust, and reduces squeaks. It helps maintain smooth faucet operation.
Why Do I Have Water Pressure Everywhere But My Kitchen Sink?
Water pressure issues at your kitchen sink often stem from clogged aerators, kinked supply lines, or partially closed shut-off valves. Sediment buildup in the faucet cartridge or blockages in the pull-out sprayer connector can also reduce flow. Check these components to restore proper pressure.
Conclusion
Low water pressure in your kitchen faucet has simple causes. Check the aerator for blockages first. Clean or replace it to restore flow. Inspect supply lines for kinks or damage. Make sure shut-off valves are fully open. Sediment buildup in the cartridge can also reduce pressure.
Cleaning or changing the cartridge may help. Sometimes, the problem lies in the sprayer connection or water heater. Regular maintenance can prevent most issues. Fix these common problems to enjoy steady water pressure again. Small steps make a big difference in your kitchen.