How to Replace a Stem on a Faucet: Step-by-Step Guide
Replacing a stem on a faucet is a common home repair that can save you time, money, and frustration. A leaky faucet is more than an annoyance—it can waste gallons of water and increase your utility bill. Many homeowners think they need a plumber for this job, but with the right guidance, most people can do it themselves.
Whether your faucet drips, won’t turn off, or feels stiff, changing the stem is often the solution.
In this guide, you’ll learn every detail needed to replace a faucet stem, even if you’ve never done plumbing work before. You’ll understand the tools required, safety tips, how to identify your faucet type, and what to do if things don’t go as planned.
You’ll also find expert advice, practical insights, and answers to the questions most beginners forget to ask. By the end, you’ll be confident enough to tackle this repair yourself and avoid common beginner mistakes.
Understanding Faucet Stems
Before you start, it’s important to understand what a faucet stem is and why it matters. The stem is a small, internal part that controls the flow of water. When you turn the faucet handle, the stem moves to open or close the water flow. Over time, the stem can wear out, causing leaks or making the handle hard to turn.
There are two main types of faucet stems:
- Compression stems: Common in older faucets. They use rubber washers that press against a valve seat.
- Cartridge stems: Found in newer faucets. They use a cartridge instead of a washer for smoother operation.
Knowing your stem type helps you buy the right replacement part and avoid unnecessary trips to the hardware store.
Why Faucet Stems Fail
Several factors can cause a faucet stem to fail:
- Worn washers or seals: In compression stems, the rubber washers degrade with use and start leaking.
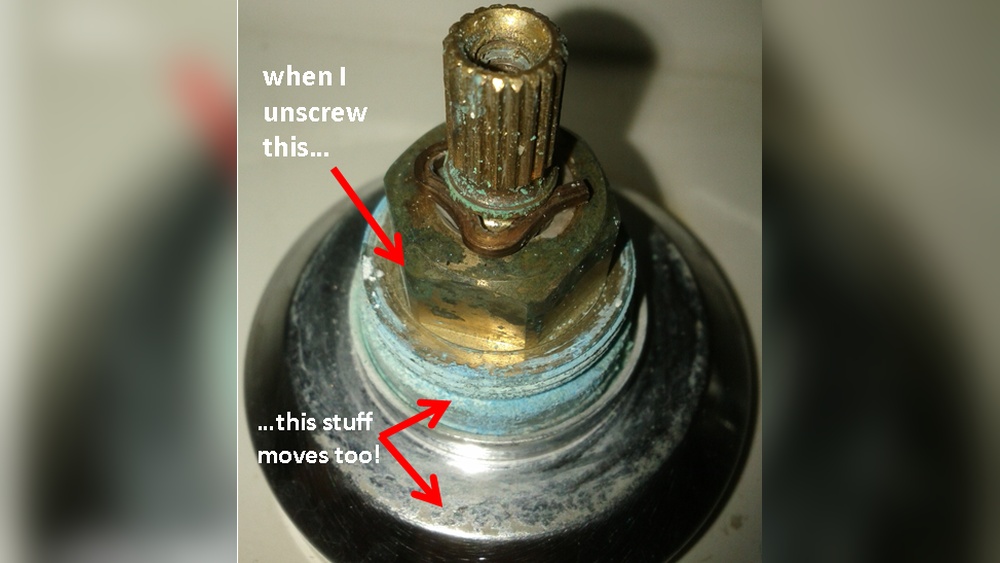
- Corrosion: Hard water or old plumbing can cause metal parts to rust or stick.
- Mineral buildup: Limescale or mineral deposits can make the stem stiff or hard to operate.
- Poor installation: If the stem was not installed properly, it may fail early.
- Normal wear and tear: Frequent use eventually wears out the moving parts.
Replacing the stem addresses most of these issues and restores your faucet’s function.
Essential Tools And Materials
Gathering the right tools before you start saves time and stress. For most faucets, you’ll need:
- Adjustable wrench
- Phillips and flathead screwdrivers
- Allen wrench (for some handles)
- Needle-nose pliers
- Plumber’s grease
- Replacement stem (specific to your faucet model)
- Replacement washers or O-rings (if not included)
- Towel or rag
- Bucket
- Flashlight
- White vinegar (for cleaning)
- Thread seal tape (optional)
Pro tip: Take the old stem to the hardware store to match it. Faucets often look similar but use different parts. Bringing the original ensures you get the right fit.
Identifying Your Faucet Type
Not all faucets are built the same, and knowing your type helps you avoid mistakes. The four most common household faucet types are:
- Compression faucet: Has two handles (hot and cold) that turn to open or close.
- Cartridge faucet: Can be single or double handle. The handle lifts or turns smoothly.
- Ball faucet: Single handle, often found in kitchens. Uses a ball bearing for movement.
- Ceramic disk faucet: Single handle, moves up and down and side to side.
Look for brand markings on the faucet or under the sink. If you can’t find them, take a photo and ask for help at the hardware store.
Step-by-step: How To Replace A Stem On A Faucet
Changing a faucet stem is a logical process. Follow these steps carefully, and you’ll have your faucet working like new.
1. Turn Off The Water Supply
Safety comes first. Look under the sink for two shutoff valves—one for hot, one for cold. Turn both clockwise until tight. If you can’t find them, shut off the main water supply to your house.
Open the faucet to release any remaining water and relieve pressure.
2. Plug The Drain
Small parts can fall down the drain easily. Put a towel, rag, or sink stopper in the drain opening. This simple step can prevent frustration later.
3. Remove The Faucet Handle
Handles are attached in different ways:
- Screw on top: Pry off the decorative cap with a flathead screwdriver, then remove the screw.
- Set screw underneath: Use an Allen wrench to loosen the small screw.
- No visible screw: Try gently lifting or twisting the handle.
Once the screw is out, pull the handle off. If it sticks, wiggle it gently or use a handle puller tool.
4. Access The Faucet Stem
With the handle off, you’ll see a retaining nut or cover. Use an adjustable wrench to unscrew it, turning counterclockwise. Be careful not to scratch the finish.
If your faucet has a decorative sleeve, unscrew or slide it off by hand.
5. Remove The Old Stem
Use pliers or your fingers to pull the stem straight out. In some faucets, you may need to twist slightly or unscrew it.
Non-obvious insight: Sometimes, mineral buildup or corrosion makes the stem hard to remove. Soak the area with white vinegar for 10–20 minutes if it won’t budge. Never force it, as you could damage the faucet body.
6. Inspect The Old Stem And Faucet
Check the stem for obvious wear, cracks, or corrosion. Also look inside the faucet for debris or damage. Clean any buildup with white vinegar and a toothbrush.
If you see deep scratches or pitting inside the faucet, it might be time for a full replacement.
7. Replace Washers, O-rings, And Seals
If your new stem did not come with new washers or O-rings, transfer them from the old stem or buy new ones. Coat them lightly with plumber’s grease for a better seal and easier operation.
8. Install The New Stem
Slide the new stem into the faucet body, aligning it as the old one was. Tighten the retaining nut with your wrench, but do not overtighten.
Beginner mistake: Overtightening can strip threads or crack the faucet. Stop when the nut feels snug.
9. Reattach The Handle
Reverse the steps you used to remove the handle. Tighten the screw, replace the decorative cap, and make sure the handle moves smoothly.
10. Turn On The Water And Test
Slowly turn the water supply back on. Open the faucet and check for leaks around the handle and under the sink.
If you see drips, turn off the water and tighten the retaining nut slightly. If leaks persist, check the washer or O-ring placement.
11. Clean Up
Remove towels and tools, and wipe the faucet clean. Congratulations—you’ve replaced your faucet stem!
Real-world Example: Kitchen Vs. Bathroom Faucets
Kitchens and bathrooms often use different faucet types. Here’s a practical comparison:
| Feature | Kitchen Faucet | Bathroom Faucet |
|---|---|---|
| Common Type | Cartridge or Ball | Compression or Cartridge |
| Handle Style | Single or double | Usually double |
| Stem Size | Larger, longer | Smaller, shorter |
| Replacement Difficulty | Moderate | Easy |
Insight: Kitchen faucet stems are usually longer and sometimes have extra features, like pull-out sprayers, making the replacement slightly more complex. Always check your faucet’s manual or model number.

Credit: www.youtube.com
Common Problems And Solutions
Even with careful work, things can go wrong. Here’s how to solve the most frequent issues:
Leaking After Replacement
- Check if washers or O-rings are seated correctly.
- Make sure the retaining nut is snug, but not overtightened.
- Inspect for cracks in the faucet body.
Handle Feels Stiff
- Apply more plumber’s grease to the stem.
- Clean out any debris or mineral buildup.
- Use white vinegar to dissolve stubborn deposits.
Handle Won’t Fit Back On
- Check for alignment issues with the new stem.
- Compare the new stem to the old—some have different shapes or splines.
- Take both parts to the hardware store for advice.
Water Won’t Shut Off
- Make sure the stem is fully seated.
- Check the installation of washers and seals.
- If the problem continues, the valve seat inside the faucet may be damaged.
How To Choose The Right Replacement Stem
Buying the wrong stem wastes time and money. Here’s how to get it right the first time:
- Identify your faucet brand and model. Look for markings on the faucet or under the sink.
- Remove the old stem and bring it to the store for comparison.
- Take measurements—length, diameter, number of splines (grooves), and type of attachment.
- Ask for help if you’re unsure. Most hardware stores have guides or staff who can match parts.
- Buy extra washers or O-rings. They’re cheap and often need replacing.
Pro tip: Many faucets look similar but use unique stems. Never guess—always match the part to your exact faucet.

Credit: diy.stackexchange.com
When To Replace The Whole Faucet
Sometimes, replacing just the stem isn’t enough. Consider replacing the entire faucet if:
- There’s visible corrosion or cracks in the faucet body.
- The faucet is older than 15–20 years.
- You can’t find replacement parts.
- Multiple leaks or problems keep coming back.
New faucets are more efficient and may save water and energy over time.
Cost Comparison: Diy Vs. Hiring A Plumber
Doing it yourself can save money, but it’s not always the best choice for everyone. Here’s a quick cost comparison:
| Task | DIY Cost | Professional Cost |
|---|---|---|
| Replacement stem | $8–$30 | Included |
| Tools (if needed) | $15–$40 | Included |
| Labor | Free (your time) | $80–$150 per hour |
| Total cost | $23–$70 | $100–$200+ |
Insight: If you already own basic tools, your only expense is the new stem and maybe a washer. If you prefer to avoid risk, hiring a plumber brings peace of mind but at a higher cost.
Advanced Tips For A Long-lasting Repair
- Always use plumber’s grease on moving parts for smooth operation and longer life.
- Clean mineral buildup inside the faucet with vinegar, especially if you have hard water.
- Replace washers and O-rings even if they look fine; they’re cheap and prevent future leaks.
- Check for leaks after a few days of use, not just right after installation.
- Keep a repair log with dates and part numbers for future reference.
- Upgrade to ceramic disk faucets if leaks are a regular problem. They’re more durable and need less maintenance.
Safety Precautions
- Turn off the water before starting any repair.
- Use tools carefully to avoid scratching or damaging the faucet.
- Wear gloves if you have sensitive skin or work with cleaning chemicals.
- Keep small parts away from children and pets.
- Double-check for leaks to prevent water damage.

Credit: www.reddit.com
Environmental Benefits Of Fixing Leaky Faucets
A dripping faucet wastes more water than you might think. According to the U.S. Environmental Protection Agency, a single leaky faucet can waste over 3,000 gallons of water per year. That’s enough for more than 180 showers!
By replacing a faulty stem, you reduce your water bill and help conserve a precious resource. It’s a simple action with a big impact on the environment.
For more information on water conservation, visit the EPA’s Fix a Leak Week resource.
Troubleshooting Unusual Problems
Sometimes, you’ll face challenges that aren’t in the manual. Here are two issues beginners often overlook:
Hidden leaks: If water drips under the sink after the repair, check the supply lines and connections. Sometimes, moving the faucet can loosen other fittings.
Difficulty matching parts: If you have an older or foreign-made faucet, parts may be hard to find. In this case, contact the manufacturer or a specialty plumbing store. Take clear photos and measurements.
How To Maintain Your Faucet After Stem Replacement
A little maintenance goes a long way in preventing future leaks:
- Turn the faucet gently; avoid forceful twisting or yanking.
- Clean the aerator every few months to remove sediment.
- Check for drips regularly, especially after guests or children use the sink.
- Use plumber’s grease on the stem and washers once a year.
These habits help your faucet last longer and work better.
What Beginners Often Forget
- To turn off the water supply. Even experienced DIYers sometimes skip this, leading to sudden water sprays.
- To plug the drain. Small screws and washers disappear quickly down open drains.
- To take the old stem to the store. Photos are helpful, but the real part is best for matching.
- To check the faucet’s brand and model. This makes finding replacement parts much easier.
- To test for leaks after reassembly—don’t assume it’s fixed until you try it.
These small steps save time, money, and stress.
Frequently Asked Questions
How Do I Know If My Faucet Stem Needs Replacing?
If your faucet drips even after turning off tightly, or the handle feels loose or hard to turn, the stem likely needs replacement. Other signs include water leaking around the handle or inconsistent water flow.
Can I Replace A Faucet Stem Without Special Tools?
Most replacements need only basic tools like screwdrivers and a wrench. An Allen wrench might be required for some handles. Specialized tools are rarely needed for standard home faucets.
How Long Does It Take To Replace A Faucet Stem?
For most people, the job takes 30–60 minutes. If it’s your first time, set aside an hour. Some faucets with stuck parts or unusual designs may take longer.
What If I Can’t Find The Exact Replacement Stem?
Try to match the old stem as closely as possible by taking it to the hardware store. If you can’t find a match, contact the faucet manufacturer or a plumbing supply store. Sometimes, universal stems work, but it’s best to get the exact part.
Will Replacing The Stem Fix All Leaks?
Replacing the stem will fix leaks caused by worn washers, O-rings, or the stem itself. If leaks continue, the problem may be with the faucet body, valve seat, or supply lines. In rare cases, a new faucet may be needed.
Taking on a faucet stem replacement can seem intimidating at first, but with careful steps and the right knowledge, it’s a manageable and rewarding project. You save money, conserve water, and gain confidence for future home repairs. If you ever feel unsure, don’t hesitate to ask an expert or call a professional—your time, home, and peace of mind are worth it.