How to Fix a Single Handle Faucet: Easy DIY Repair Guide
Fixing a single handle faucet can feel intimidating if you have never tried before. Water is leaking, the handle is stuck, or the flow is weak—these problems can make daily life harder. The good news is, most single handle faucet issues are simple to solve if you follow the right steps and have some patience.
You do not need to be a plumbing expert or have expensive tools. With some basic instructions, you can restore your faucet to smooth working order and save money on plumber fees.
This guide will show you how to fix a single handle faucet, step by step. You will learn how to identify the main problems, what tools you need, how to disassemble and reassemble the faucet, and how to deal with common surprises.
You will also learn some tips that even many first-timers miss, so your repair works the first time and lasts for years. If you want to avoid calling a plumber for every drip or stiff handle, keep reading. By the end, you’ll feel confident to tackle most single handle faucet issues on your own.
Understanding Your Single Handle Faucet
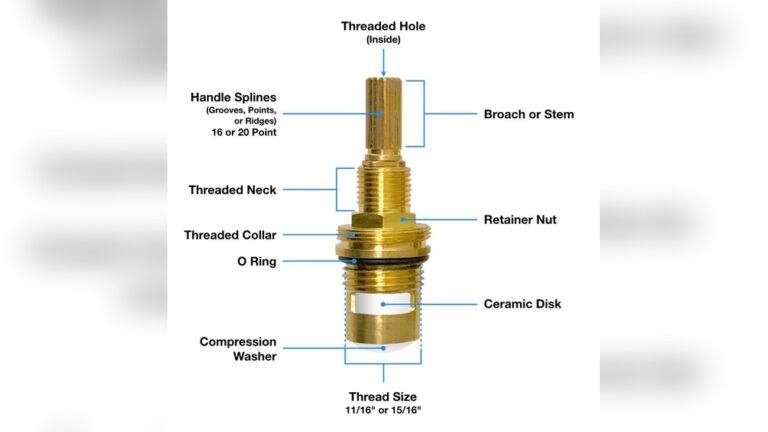
Not all single handle faucets are the same. Some have a ball valve, others use a cartridge or ceramic disc. Knowing which one you have is important because the parts and repair steps can be different.
- Ball valve faucets use a rotating ball to control water flow and temperature. They usually have a rounded cap under the handle.
- Cartridge faucets use a plastic or metal cartridge inside the body. When you move the handle, the cartridge slides to mix hot and cold water.
- Ceramic disc faucets use two hard ceramic plates. These are usually found in newer, higher-end models.
If you are not sure which type you have, check the brand’s website or look for a model number on the faucet. Some companies, like Moen or Delta, have guides online. Taking a photo before you start can help if you need to ask for help at a hardware store.
Common Problems In Single Handle Faucets
Most people face one or more of these issues with a single handle faucet:
- Dripping from the spout
- Leaking under the handle
- Stiff or hard-to-move handle
- Low water flow
- Noisy faucet operation
Each problem has a different cause. For example, a drip usually means a worn O-ring or cartridge, while a stiff handle might just need cleaning and lubrication. Fixing the right part saves time and avoids extra repairs.
Tools And Materials You Need
Before starting, gather all the tools and materials. This helps you avoid rushing to the store in the middle of your repair.
- Adjustable wrench (or basin wrench for hard-to-reach nuts)
- Phillips and flathead screwdrivers
- Allen wrench (sometimes called a hex key, often 1/8” or 3/32”)
- Needle-nose pliers
- Faucet repair kit (includes O-rings, springs, and seals for your faucet type)
- Replacement cartridge or ball (check your faucet model)
- Plumber’s grease (for lubricating O-rings and seals)
- White vinegar (for cleaning mineral deposits)
- Rags or towels
- Bucket or bowl (to catch water)
- Tape (masking or painter’s, to protect finish)
- Flashlight (if working in a dark area)
Having these ready means you can work smoothly. If your faucet is older, you might need a cartridge puller tool, which most hardware stores sell.
Preparing To Fix The Faucet
Safety and preparation are key. Always turn off the water before you start. Under the sink, you’ll see two shut-off valves (one for hot, one for cold). Turn both clockwise until they stop. Open the faucet to drain any water left inside.
Cover the sink drain with a rag or stopper. This prevents small screws or parts from falling down the drain—a very common mistake! Lay a towel in the sink to protect both the faucet and the sink surface.
Take a clear photo of your faucet before you begin. A picture can help you remember how parts fit back together. Keep all screws and parts in a small container so nothing gets lost.
:max_bytes(150000):strip_icc()/repairing-a-single-handle-disk-faucet-1824878-hero-b3daee9af5174d8f9b9cb4a2582e7140.jpg)
Credit: www.thespruce.com
Step-by-step Guide To Fixing A Single Handle Faucet
Repair methods vary by faucet type, but the process is similar for most brands and models.
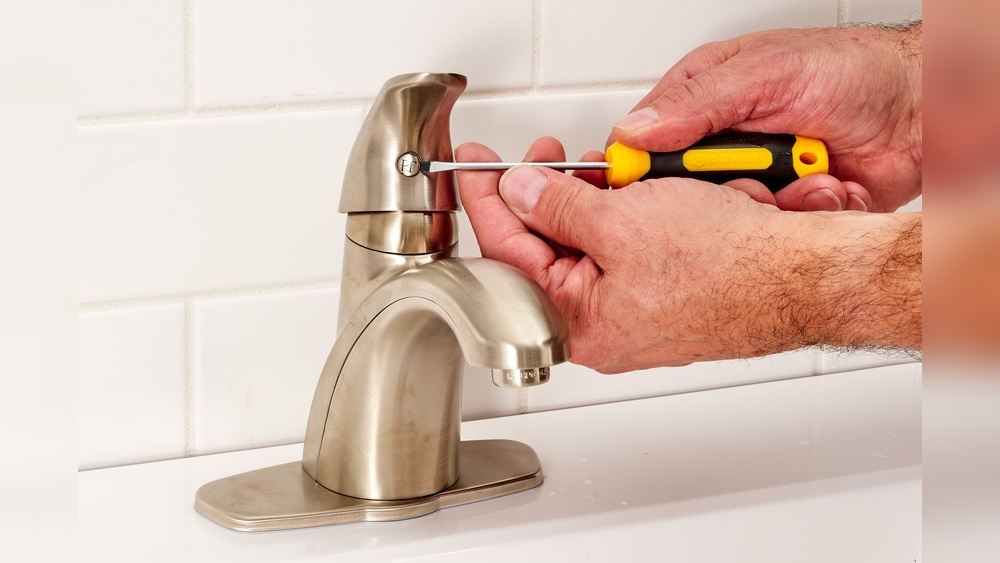
1. Remove The Faucet Handle
The handle is usually attached by a small screw. Look for a decorative cap on the handle (sometimes marked H/C for hot/cold). Pry off the cap gently with a flathead screwdriver. Use the correct Allen wrench or screwdriver to remove the set screw. Pull the handle straight up and off. If it sticks, wiggle gently or spray a little penetrating oil.
Non-obvious tip: Handles can corrode and stick over time. If yours won’t move, wrap a towel around it and use gentle rocking pressure. Avoid using too much force, or you may crack the handle.
2. Inspect And Remove The Faucet Assembly
Under the handle, you will see a cap or collar. This is usually threaded and can be unscrewed by hand or with an adjustable wrench. Some models have a retaining nut. Remove any washers or clips and set them aside in order.
For cartridge or ball faucets, you will see the cartridge or ball mechanism. Make a note of how it sits—photos help here. If your faucet has springs or small rubber seats, remove them with needle-nose pliers.
3. Check And Replace Worn Parts
- For ball valve faucets, check the ball for scratches or wear. Also, replace the seats and springs, which are usually the cause of leaks.
- For cartridge faucets, pull out the old cartridge with pliers. If it sticks, use a cartridge puller tool.
- For ceramic disc faucets, remove the disc cartridge and inspect for cracks or chips.
Replace any worn O-rings, seals, or cartridges. Most hardware stores sell repair kits with all the parts you need. Take your old cartridge or ball with you to match the size and shape.
Non-obvious tip: Even if only one O-ring looks damaged, replace all the seals and O-rings you can reach. This prevents future leaks and saves you another repair soon.
4. Clean All Faucet Parts
Mineral deposits and grime can cause leaks and stiff handles. Soak all metal parts in white vinegar for 10–15 minutes, then scrub gently with an old toothbrush. Rinse and dry completely.
Clean the faucet body and inside the housing. Use a rag to wipe away old grease, dirt, or buildup.
5. Lubricate And Reassemble
Apply a thin layer of plumber’s grease to all O-rings, seals, and moving parts. This helps the faucet handle move smoothly and prevents early wear.
Put the new or cleaned cartridge/ball back into the faucet body. Make sure it sits in the correct position. Replace the cap, washer, and retaining nut, tightening gently with the wrench—do not overtighten.
Reattach the handle, replace the set screw, and snap the decorative cap back on.
6. Turn On Water And Test
Open both shut-off valves slowly. Turn the faucet on and off, checking for leaks under the handle and at the spout. Move the handle side to side and up and down to check for smooth movement.
If the faucet still drips, double-check that all seals are in place and the cartridge is installed correctly. If the handle is stiff, add more plumber’s grease.
7. Fixing Low Water Flow
If your faucet’s water flow is weak, the problem could be aerator blockage or debris inside the cartridge.
- Unscrew the aerator (the small filter at the tip of the spout).
- Soak it in vinegar and scrub away mineral deposits.
- Rinse, dry, and screw it back.
If water flow is still low, flush the faucet by opening the handle with the aerator removed. Let water run for 15–20 seconds to clear debris.
8. Dealing With Noisy Faucets
Some single handle faucets make a whistling or banging noise. This often means air is trapped, or a washer is loose. Reassemble the faucet, making sure all washers are tight and in place. Air can be flushed out by running the water for a minute.
Comparing Common Single Handle Faucet Types
Here’s a quick comparison to help you know what you’re working with:
| Type | Main Parts | Common Problems | Repair Difficulty |
|---|---|---|---|
| Ball Valve | Ball, seats, springs, O-rings | Dripping, stiff handle | Medium |
| Cartridge | Cartridge, O-rings, seals | Leaking, hard handle | Easy |
| Ceramic Disc | Disc cartridge, seals | Dripping, rare leaks | Easy–Medium |
Knowing your faucet type helps you buy the right repair kit and saves time.
Troubleshooting Unusual Problems
Sometimes, repairs do not go as planned. Here’s how to handle some less common, but tricky, issues.
Faucet Handle Will Not Come Off
If the handle is stuck, mineral deposits or corrosion are usually the cause. Spray some white vinegar around the base and let it sit for 10 minutes. Try rocking the handle gently. Never use a hammer—this can break the faucet.
Cartridge Or Ball Will Not Budge
If the cartridge or ball is stuck, use a cartridge puller tool. These cost a few dollars and save a lot of frustration. If you force it, you may damage the faucet body.
Leaks Continue After Repair
Double-check that the new cartridge or ball is the correct type and fits snugly. Old seats or springs left inside can cause leaks. Also, make sure all O-rings and seals are in place and well lubricated.
Water Mixes Incorrectly (too Hot Or Cold)
If you notice the water is always too hot or cold, the cartridge may be installed backward. Remove and rotate it 180 degrees, then reinstall.
Handle Feels Loose
A loose handle is usually just a missing or stripped set screw. Replace the screw, or use thread sealant to help it grip better.
When To Call A Professional
Most single handle faucet repairs are easy to do yourself. But sometimes, calling a plumber is the smart choice. Call for help if:
- The faucet body is cracked or badly corroded
- The leak is deep inside the wall or under the sink
- You cannot remove a stuck part after several attempts
- You see mold, water stains, or soft spots under the sink
It’s better to pay for expert help than risk making a bigger problem.

Credit: www.pfisterfaucets.com
Cost Of Diy Vs. Professional Faucet Repair
Many people wonder if fixing a faucet themselves is really cheaper. Here’s a simple cost comparison:
| Repair Type | DIY Cost (USD) | Pro Plumber Cost (USD) | Time Needed |
|---|---|---|---|
| Replace Cartridge | $10–$30 | $100–$200 | 30–45 min |
| Replace Ball & Seats | $15–$40 | $120–$220 | 45–60 min |
| Clean/Replace Aerator | $2–$10 | $50–$80 | 10–20 min |
As you can see, doing it yourself can save you $100 or more per repair.
Mistakes To Avoid When Fixing A Single Handle Faucet
- Forgetting to turn off water supply. This can flood your sink and cause water damage.
- Losing small parts. Always use a bowl to hold screws, springs, and O-rings.
- Using the wrong replacement parts. Always match the cartridge or ball by brand and model.
- Overtightening nuts and screws. This can crack the faucet or strip threads.
- Not cleaning old buildup. Skipping cleaning causes leaks to return quickly.
Many beginners rush these steps. Take your time, and double-check each part.
How Long Should A Single Handle Faucet Last?
With regular cleaning and replacing worn parts, most single handle faucets last 10 to 15 years. High-quality models may last longer. Hard water or poor maintenance can shorten the life to just a few years. Replacing O-rings and cartridges every 3–5 years prevents most leaks and keeps your faucet working smoothly.
Signs It’s Time To Replace, Not Repair
Sometimes, repairing is not enough. Replace your faucet if:
- The body is cracked or corroded
- Multiple repairs have failed
- Water leaks from several places at once
- The finish is peeling or pitted
New faucets are more efficient and often use less water. Look for models with the WaterSense label for better performance.
Environmental Impact Of Leaky Faucets
A single dripping faucet can waste over 3,000 gallons (about 11,400 liters) of water per year. Fixing leaks quickly saves water and reduces your utility bills. According to the U.S. Environmental Protection Agency, fixing household leaks can save an average family 10% on their water bill. You can find more data on this at the EPA WaterSense website.
Practical Tips For Long-lasting Repairs
- Use only high-quality replacement parts from the same brand as your faucet.
- Apply plumber’s grease every time you open the faucet body.
- Clean aerators and faucet tips every few months to prevent blockages.
- If you live in a hard water area, install a small water filter to reduce mineral buildup.

Credit: www.youtube.com
Frequently Asked Questions
What If My Faucet Handle Is Stuck And Will Not Come Off?
Try spraying a little white vinegar around the handle base and let it sit for 10 minutes. Gently wiggle the handle side to side. If it still won’t budge, use a handle puller tool. Do not use too much force, or you could break the handle or faucet body.
How Do I Know If My Faucet Uses A Cartridge, Ball, Or Ceramic Disc?
Check the faucet’s brand and model—most brands have diagrams online. Ball faucets have a round cap under the handle, cartridge faucets use a long, thin cartridge, and ceramic disc faucets have a wider, flat cartridge. If you are unsure, take a photo and ask at a hardware store.
Can I Fix A Leaking Single Handle Faucet Without Turning Off The Water?
No, always turn off the water supply before starting any faucet repair. Working without shutting off the water can cause flooding and make it hard to replace parts safely.
Why Does My Faucet Leak Even After Replacing The Cartridge Or Ball?
This often means the seals or O-rings were not replaced, or the new cartridge does not fit properly. Double-check that all parts are installed correctly and that the cartridge or ball matches your faucet’s brand and model.
How Often Should I Replace Parts Inside My Single Handle Faucet?
Most cartridges, balls, and O-rings last 3 to 5 years. Replace them if you notice leaks, stiff handles, or low water flow. Regular maintenance can extend your faucet’s life and prevent sudden problems.
Fixing a single handle faucet is a skill anyone can learn. With the right tools, clear instructions, and a little patience, you can solve most common problems and enjoy a leak-free faucet for years. You will not only save money but also help conserve water and keep your home running smoothly.